Dull Knives Are Dangerous — The Complete Sharpening System Guide for Every Budget
Here’s a sentence that sounds wrong but is absolutely true: a dull knife is more dangerous than a sharp one.
When your knife is dull, you press harder. When you press harder, you lose control. When you lose control, the blade slips. And when the blade slips, you’re sitting in the ER explaining to a nurse why you thought the avocado pit technique you saw on TikTok would work.
Sharpening isn’t optional. It’s not a “someday” skill. It’s as fundamental to knife ownership as putting gas in your car. Let’s walk through why dull knives are genuinely dangerous, how sharpening works at the metallurgical level, and exactly which system you should buy based on your budget and skill level.
The Statistics: Why Dull Knives Send People to the ER
Here’s an uncomfortable number: over 400,000 people visit US emergency rooms annually for kitchen knife injuries alone, according to data from the National Electronic Injury Surveillance System (NEISS). That’s more than 1,000 people per day. And a disproportionate share of those injuries involve dull knives.
Why? Because dull knives require more force. A sharp chef’s knife should glide through an onion under its own weight — you guide the blade, gravity does the work. A dull knife needs you to push, saw, and muscle through every cut. That extra force means you’re one slip away from a serious laceration. And the injuries from dull knives tend to be worse: the tearing action of a dull edge does more tissue damage than the clean slice of a sharp one.
Consider this: a sharp knife cuts through a tomato skin with roughly 5-10 Newtons of force — about the weight of a small apple pressing down. A dull kitchen knife might need 40-60 Newtons, or more. That’s the difference between conscious control and white-knuckle forcing. Multiply that by the thousands of cuts you make in a year, and that dull blade is basically a statistical inevitability waiting to happen.
The Physics of Dull vs. Sharp: What’s Happening at the Edge
Under a microscope, a knife edge isn’t a perfect line — it’s a landscape of microscopic teeth. A sharp edge has a radius of roughly 0.3-0.5 microns at the apex. A dull edge? The apex rounds over to 5-10 microns or more. That rounding changes everything about how the knife interacts with material.
When a sharp edge meets a material, the force concentrates onto an incredibly small contact area. Pressure = Force ÷ Area, so that tiny contact patch means huge pressure. The blade’s apex pushes between material fibers, separating them cleanly. This is why a truly sharp knife feels like it’s “falling through” food — the pressure at the apex is so high that the material parts with almost zero resistance.
A dull edge, by contrast, spreads that same force over a much larger contact area. Pressure drops. Instead of separating fibers, the rounded edge crushes and tears them. This is why dull knives smash tomatoes instead of slicing them. It’s also why dull knives slide off onion skins and potato peels — there’s not enough pressure at the contact point to initiate a cut, so the blade skates sideways. That sideways movement is when fingers get in the way.
The $500 Mistake I Made (So You Don’t Have To)
I ruined my first good kitchen knife on a $15 pull-through sharpener. The kind with two carbide V-slots that promise “professional sharpness in 3 seconds.” It did sharpen the knife — but by literally ripping steel off the edge at a random angle that would make a metallurgist weep. The edge was toothy, uneven, and the heel had a recurve from where I dragged unevenly. After six months of those “sharpenings,” my $130 Wüsthof had a blade profile that looked like a banana.
After that expensive lesson, I bought a proper whetstone and spent a weekend learning. The results weren’t pretty at first — my first attempt produced an edge that wouldn’t cut warm butter. But by Sunday afternoon, my chef’s knife could push-cut through a ripe tomato with zero pressure. That feeling — the blade dropping through food like it’s not even there — is genuinely addictive. It’s the moment you realize every meal you’ve ever made was harder than it needed to be.
The Three Sharpening Systems (And Who Each Is For)
1. Whetstones — The Purist’s Path
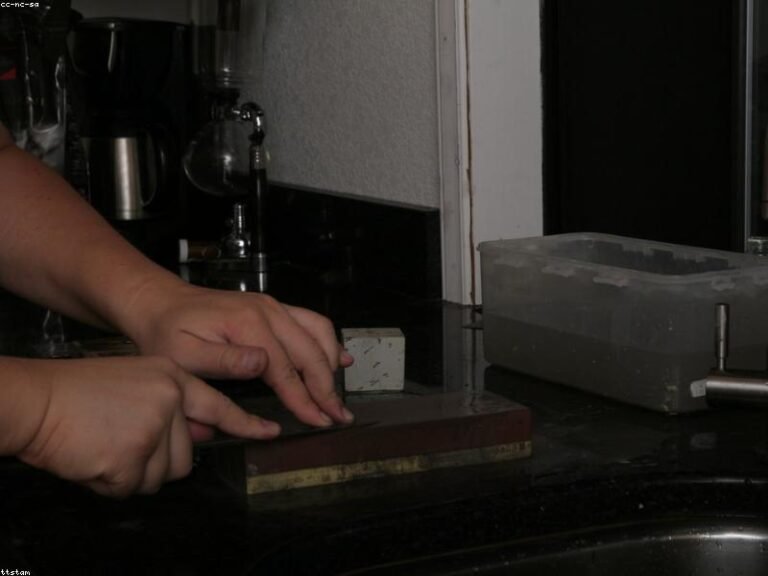
Freehand sharpening on whetstones is the traditional method that gives you complete control over every variable: angle, pressure, slurry development, grit progression. Master it, and you can achieve edges that rival straight razors. The learning curve is real — expect mediocre results for your first 5-10 sessions — but the skill stays with you for life.
Best for: people who enjoy the craft, sharpen kitchen knives regularly, and don’t mind investing time in a skill. Start with: the Sharp Pebble 1000/6000 combo stone ($35) for budget, or the King KDS 1000/6000 ($55) for a traditional Japanese water stone with better feedback.
2. Guided Angle Systems — Easiest Path to Consistent Results
Guided systems remove the hardest variable: holding a consistent angle. A clamp holds your blade while a rod or arm keeps the abrasive at a fixed, repeatable angle. You just move the stone back and forth. Results are precise and repeatable from day one — even your first edge will be better than most freehand beginners achieve after weeks of practice.
Best for: EDC and pocket knife users who want sharp knives without the freehand learning curve. Start with: the Worksharp Precision Adjust ($65) for the best value guided system on the market, or the Lansky Deluxe 5-Stone ($55) for a classic clamp-based system with more grit options.
3. Ceramic Rod / V-Systems — The Maintenance Masters
Ceramic rod systems like the Spyderco Sharpmaker are maintenance tools, not heavy-duty sharpeners. They excel at keeping an already-sharp edge in peak condition — 8-10 quick passes per side once a week, and you’ll rarely need a full resharpening. They also handle serrated edges and recurves, which are nearly impossible to sharpen on flat stones.
Best for: people whose knives are already sharp and just need maintenance. Also the only practical option for serrated blades. Start with: the Spyderco Tri-Angle Sharpmaker ($90) — it lives on my counter and gets used weekly.
Comprehensive Sharpening System Comparison
| Sharpener | Type | Grit Range | Best For | Skill Level | Price | Rating |
|---|---|---|---|---|---|---|
| Sharp Pebble 1000/6000 | Whetstone combo | 1000-6000 | Beginners, kitchen | Beginner | $35 | ★★★★½ |
| King KDS 1000/6000 | Japanese water stone | 1000-6000 | Kitchen, carbon steel | Intermediate | $60 | ★★★★½ |
| Naniwa Professional 800 | Splash-and-go | 800 | High-end kitchen | Intermediate+ | $70 | ★★★★★ |
| Worksharp Precision Adjust | Guided angle | 320-Ceramic | EDC, pocket knives | Beginner | $65 | ★★★★★ |
| Lansky Deluxe 5-Stone | Guided rod | 70-1000 | Fixed blades, budget | Beginner | $55 | ★★★★½ |
| Spyderco Sharpmaker | Ceramic rod V | Medium+Fine | Touch-ups, serrations | Beginner | $90 | ★★★★½ |
| Worksharp Ken Onion | Powered belt | P120-X4 | High volume, heavy blades | Intermediate | $140 | ★★★★½ |
What Grit to Use When — The No-Nonsense Guide
- Below 400 grit: Edge repair only. Chips, reprofiling, removing damage. Not for routine sharpening.
- 400-800 grit: Setting a new bevel or bringing a very dull knife back to life. Removes material quickly.
- 1000-2000 grit: The sweet spot for most EDC and kitchen knives. Sharp enough for tomatoes and paper, toothy enough to bite. This is where you stop for most pocket knives.
- 3000-5000 grit: Polishing and refining. Ideal for kitchen knives that need to push-cut. Overkill for most EDC blades.
- 6000-8000 grit: Mirror polish territory. Japanese kitchen knives, straight razors, and showing off.
- Above 8000 grit: You’re either a sushi chef or you’ve fallen into a sharpening rabbit hole. Both are valid.
Quick rule: Stop at 1000-2000 grit for most work. A slightly toothy edge actually cuts fibrous materials (rope, cardboard, food skin) better than a polished one. Mirror edges look beautiful on Instagram but the tooth from a 1000-grit stone is what gets work done.
Angle Guide: What Angle for What Knife
- 10-15° per side: Japanese kitchen knives, straight razors. Scary sharp, delicate edge. Cuts like a dream, rolls if abused.
- 15-17° per side: Western kitchen knives, chef’s knives. The sweet spot for most cooking. Sharp enough for clean cuts, tough enough for daily use.
- 17-20° per side: EDC pocket knives. Good mix of sharpness and durability. Edge survives box tape and zip ties.
- 20-25° per side: Outdoor, survival, hard-use knives. Edge that survives batoning and wood carving.
- 25-30° per side: Axes, machetes, chopping tools. Pure durability over sharpness.
Beginners: Here’s How to Start Sharpening Today
Don’t overcomplicate this. Here’s the exact path I recommend for anyone starting from zero:
- Buy a combo stone. The Sharp Pebble 1000/6000 ($35) comes with everything: stone, base, angle guide, flattening stone. One purchase, ready to go.
- Practice on a cheap knife first. Don’t learn on your $200 Japanese gyuto. Grab a beater from the kitchen drawer and get your technique down. You’ll scratch it, round the tip, and create uneven bevels. That’s fine. That’s learning.
- Use the Sharpie trick. Color the edge bevel with a black permanent marker. Make one pass on the stone. Where the marker is worn away is where you’re actually hitting the edge. Adjust your angle until you’re removing marker from the entire bevel in one pass.
- Feel for a burr. As you sharpen one side, a tiny wire edge (burr) will form on the opposite side. You can feel it with your fingernail. Once you feel a burr along the entire edge, switch sides. This is the single most important skill to master.
- Finish light. Once you’ve created and removed burrs on both sides at 1000 grit, switch to 6000 grit. Use feather-light pressure — the weight of the blade is almost enough. 10-15 passes per side.
- Strop. 10-15 passes on a leather strop with polishing compound. This is the $20 secret that turns a sharp knife into a scary-sharp knife.
The One Non-Negotiable Tool
Whatever system you choose, add one thing: a leather strop with compound. It’s $20 and adds months between full sharpenings. 10-15 passes on a loaded strop restores the micro-bevel and brings back “sticky sharp” in under 30 seconds. It’s the most overlooked, highest-impact tool in all of knife maintenance.
A strop doesn’t remove metal — it realigns the microscopic edge that rolls over during use. Think of it as combing hair versus cutting it. Weekly stropping means you might only need to actually sharpen your knife twice a year instead of twice a month.
Check Leather Strops on Amazon →
Bottom Line
Sharpening isn’t a chore — it’s the final 20% of knife ownership that makes the first 80% worthwhile. A $20 Mora sharpened well cuts better than a $200 Benchmade with a dull edge. The tools are affordable, the skills last a lifetime, and the first time you push-cut a ripe tomato with zero pressure, you’ll wonder why you waited so long.
Pick a system that matches your personality and budget. Spend an hour learning it. Then enjoy the daily pleasure of a tool that does exactly what you ask, when you ask, without a fight. Your fingers — and your avocado toast — will thank you.
Disclosure: As an Amazon Associate I earn from qualifying purchases. All recommendations based on personal testing and genuine opinion — never paid placements. Injury statistics sourced from NEISS public data via the US Consumer Product Safety Commission.