How to Sharpen Kitchen Knives at Home: The Complete Beginner Guide
A sharp kitchen knife is not just a pleasure to use — it is safer than a dull one. Dull blades require more force, increasing the likelihood of slips and accidents. Yet many home cooks put off sharpening because it seems intimidating or they are not sure where to start. This step-by-step guide demystifies kitchen knife sharpening and gives you the confidence to maintain razor-sharp edges at home.
## Sharpening vs. Honing: Know the Difference
Before diving into technique, it is crucial to understand the distinction between sharpening and honing, as they serve different purposes and use different tools.
### Honing
Honing does not remove metal — it realigns the microscopic edge of the blade that bends and folds over during normal use. Think of it as straightening rather than sharpening. A honing rod (often mistakenly called a sharpening steel) should be used regularly — ideally before each cooking session — to maintain the edge between sharpenings.
Honing works well on softer German-style knives (56-58 HRC) but is less effective on harder Japanese knives (60+ HRC). For Japanese knives, a ceramic honing rod or leather strop is more appropriate.
### Sharpening
Sharpening removes metal from the blade to create a new edge. This is necessary when the edge has worn down beyond what honing can restore — typically every few months for home cooks, depending on knife quality, usage, and technique. Sharpening requires abrasive tools: whetstones, guided systems, or electric sharpeners.
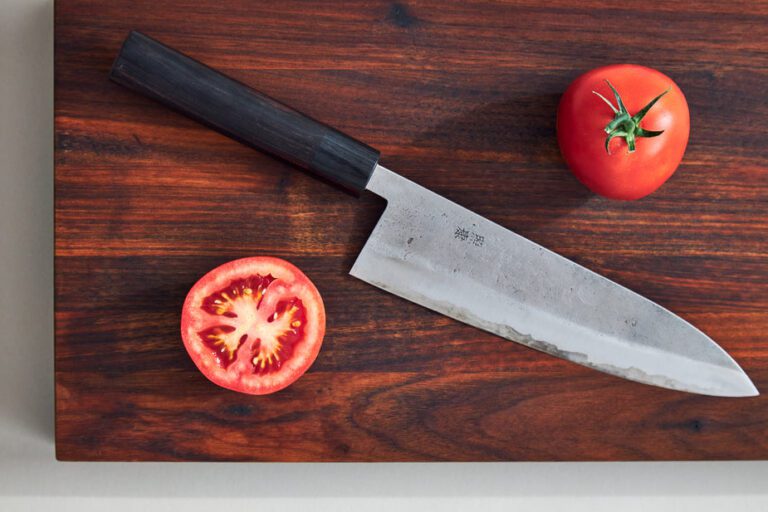
A simple test: if your knife struggles to cleanly slice through a ripe tomato without squishing it, it is time to sharpen, not just hone.
## Sharpening Methods
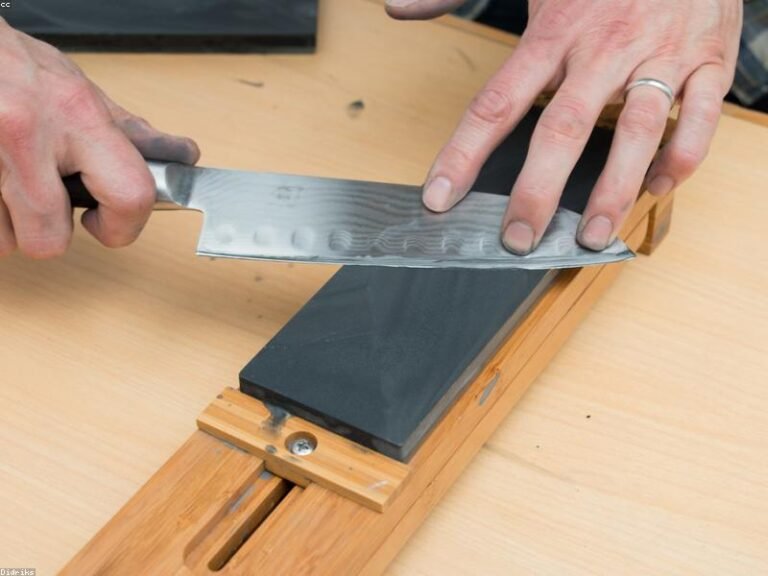
### Whetstone Sharpening (Recommended)
Whetstone sharpening offers the most control and produces the best results, though it requires practice to master. The term whetstone comes from the Old English word whet meaning to sharpen, not from water — though water stones are the most common type today.
**What You Need:**
– A combination whetstone with coarse (400-600 grit) and medium (1000 grit) sides
– A flattening stone or lapping plate to keep your stone flat
– Water for lubrication
– A stable work surface with a non-slip base
A King KDS 1000/6000 or Shapton Pro 1000 are excellent starter stones. Avoid super-cheap stones from unknown brands — they wear unevenly and make learning harder.
**Step-by-Step Whetstone Technique:**
1. **Soak the stone.** Water stones need soaking — typically 10-15 minutes for coarse stones, less for fine stones. The stone should stop bubbling when fully saturated. Splash-and-go stones (like Shapton Pro) only need surface water.
2. **Set up your station.** Place the stone on a non-slip base or damp towel on a stable surface at a comfortable height. Position the stone perpendicular to your body with the lower-grit side up.
3. **Find the angle.** The key to sharpening is maintaining a consistent angle. For Western knives, aim for 20 degrees per side. For Japanese knives, 15 degrees per side. Visualize the angle by halving a 45-degree angle (for 22.5 degrees, close to 20). Use an angle guide if you are just starting — a wedge or clip-on guide takes the guesswork out.
4. **Start on the coarse side.** With the edge facing away from you, place the heel of the blade on the stone at your chosen angle. Apply moderate, even pressure with your fingertips on the blade, directly over the area making contact with the stone. Push the blade forward and across the stone in one smooth motion, as if trying to slice a thin layer off the top of the stone. The entire edge from heel to tip should make contact during the stroke.
5. **Work in sections.** Divide the blade into three sections — heel, belly, and tip — and work each section with controlled strokes. For the curved belly and tip, lift the handle slightly to maintain the angle as the curve of the blade contacts the stone. Count strokes and use equal numbers on each side of the blade.
6. **Create a burr.** Continue on the coarse stone until you feel a burr — a tiny wire edge of metal that forms on the opposite side of the blade. You can detect it by running your fingertip gently across the edge. The burr should be consistent along the entire edge length. Only when you have a full burr on one side should you move to the other.
7. **Raise the burr on the other side.** Flip the blade and repeat the process until the burr flips to the first side. This ensures you have fully apexed the edge — both sides of the blade meet at a crisp point.
8. **Refine on the medium/fine side.** Flip the stone and repeat the process on the 1000-grit side. This time, use lighter pressure and focus on removing the scratch pattern from the coarse stone. You are refining the edge, not removing significant metal. Reduce pressure progressively as you work.
9. **Deburr.** A remaining burr will make the edge feel sharp initially but dull quickly in use. Deburr by making very light, alternating passes on the fine stone, then draw the edge gently through a piece of cork, soft wood, or a wine cork. Strop on bare leather or with compound for the final polish.
10. **Test the edge.** The paper test is the classic verification — the knife should cleanly slice through a sheet of printer paper held loosely in one hand without tearing. A tomato test is even more revealing — the blade should bite into the skin under its own weight.
Master the technique with a quality whetstone: [Beginner Whetstone Kit](https://www.amazon.com/s?k=whetstone+sharpening+kit+beginner&tag=bladeowl-20)
### Guided Sharpening Systems
If freehand whetstone sharpening feels too daunting, a guided system provides excellent results with much less practice. Systems like the Work Sharp Precision Adjust, Lansky, or KME use a clamp to hold the knife at a fixed angle while you move a stone across the edge.
**Advantages:**
– Perfectly consistent angle every time
– Much easier learning curve
– Repeatable results
– Great for premium knives where you want guaranteed angle precision
**Disadvantages:**
– Slower setup and takedown
– More expensive entry cost
– Less satisfying (subjective, but many knife enthusiasts enjoy the skill of freehand sharpening)
– Limited to certain blade lengths and shapes
Guided systems are excellent for beginners who want guaranteed results, and for experienced users sharpening expensive knives where mistakes would be costly.
Recommended guided systems: [Knife Sharpening Systems](https://www.amazon.com/s?k=guided+knife+sharpener+system&tag=bladeowl-20)
### Electric Sharpeners
Electric sharpeners use motorized abrasive wheels to sharpen knives quickly with minimal skill required. They are the fastest method but also the most aggressive — they remove significant metal and can shorten the life of your knives if used improperly.
**When to use:** For inexpensive knives where speed matters more than edge quality, or for cooks who will not invest time in learning other methods.
**When to avoid:** For high-quality forged knives, Japanese knives with thin edges, or any knife with sentimental or monetary value. The aggressive material removal and potential for overheating the edge can ruin good knives.
### Pull-Through Sharpeners
These V-shaped carbide or ceramic sharpeners that you pull the blade through are convenient but problematic. The fixed angle may not match your knife’s edge geometry, the carbide cutters are extremely aggressive, and they can create a wavy, uneven edge.
For a five-dollar beater knife, a pull-through sharpener keeps it functional. For anything you value, invest in a whetstone or guided system instead.
## Honing and Stropping for Maintenance
Between sharpenings, maintain your edge with regular honing or stropping.
### Using a Honing Rod
1. Hold the rod vertically with the tip planted on a cutting board or towel.
2. Place the heel of the blade against the top of the rod at a 15-20 degree angle.
3. Draw the blade down and across the rod in one smooth motion, pulling the entire edge from heel to tip across the rod. The motion should feel like you are trying to slice a thin layer off the rod.
4. Alternate sides, 5-7 passes per side.
5. Use light pressure — you are aligning the edge, not grinding it.
### Using a Leather Strop
Stropping is the gentlest method of edge maintenance and produces the finest edge. A leather strop loaded with polishing compound (green compound is a good all-purpose choice) polishes the edge to a mirror finish and removes any remaining burr.
1. Lay the strop flat on a table or hold it taut.
2. Place the blade on the strop at the same angle you sharpen at, edge facing away.
3. Draw the blade backward (spine-leading) across the strop — never edge-first, which will cut into the leather.
4. Alternate sides, 10-15 passes per side with very light pressure.
5. Test the edge — it should feel noticeably sharper and smoother cutting.
A strop is also excellent for touch-ups between sharpenings, extending the time between full sharpening sessions significantly.
Get a leather strop: [Knife Stropping Kit](https://www.amazon.com/s?k=leather+strop+sharpening&tag=bladeowl-20)
## Common Sharpening Mistakes
### Inconsistent Angle
The most common beginner mistake is failing to maintain a consistent angle throughout the stroke. The result is a rounded, uneven edge that will not stay sharp. Use an angle guide, mark the edge with a Sharpie marker to see where the stone is making contact, and practice slowly with deliberate attention to angle.
### Too Much Pressure
Excessive pressure creates a larger burr, removes more metal than necessary, and can flex the blade, making angle control harder. Use moderate pressure on coarse stones and very light pressure on fine stones. Let the abrasive do the work.
### Skipping the Burr
Without developing a full burr along the entire edge, you have not fully apexed the edge. A burr is evidence that you have reached the very tip of the edge. No burr means a rounded edge that will feel sharp but perform poorly.
### Uneven Stroke Distribution
Working one section of the blade more than others creates an uneven edge. Divide the blade into sections and ensure equal attention to each. Count strokes to keep yourself honest.
### Neglecting to Flatten Stones
Whetstones wear unevenly, developing low spots that make consistent angle control impossible. Flatten your stones regularly — before every use for precise work, at least every few sessions for general use. A flattening stone or diamond lapping plate is essential equipment.
## When to Seek Professional Sharpening
If you have a damaged blade with chips or a broken tip, if your knife is extremely dull and you want to establish a new edge angle, or if you simply do not have time to learn and practice, professional sharpening is a valid option. Most kitchen supply stores and some farmers markets offer sharpening services.
Expect to pay $5-10 per knife for standard sharpening, more for repairs. Professional sharpening once or twice a year, with regular honing at home in between, keeps knives performing well with minimal effort.
## Conclusion
Sharpening kitchen knives at home is a learnable skill that pays dividends every time you cook. The investment in a quality whetstone and the time to learn proper technique transforms your relationship with your kitchen tools. Food preparation becomes faster, safer, and more enjoyable when your knives glide through ingredients effortlessly.
Start with a quality whetstone, be patient with yourself during the learning curve, and remember that every expert was once a beginner who kept practicing. Your future self — standing at the cutting board with a razor-sharp blade — will thank you.
Get started today: [Complete Knife Sharpening Starter Kit](https://www.amazon.com/s?k=knife+sharpening+starter+kit&tag=bladeowl-20)